Convert Program In Software –: We know that the software is a packages of program. Software is a .exe file that run in our computer or system. Program are Written in programming languages as like c programming, c++ programming, Python Programming language, Visual Basic programming, C# programming etc. First the program are written in these languages. For converting a program into software we create a .exe file in visual studio.
How To create a .exe file -: We know that there are many language are available. There platform are different to each other. For example visual basic, C# programming, C++ etc. are choosing the visual studio. Like the C programming choose the turbo c.Python and Pearl are interpreted language.Java language using java compiler for converting into .exe file. Here we will see how to convert a program in software using visual studio. There process are different methods
Convert Program in software using Visual Studio
We can convert some programming language program into .exe file. For converting these program are same for all language . These process are same for all language as like visual basic, c# program, c++ etc.
First we convert visual basic Program into software-: First create a program which we want to convert into .exe file as like we have learn to create a Image Viewer software. After creating a program save the program in your system.
Now open a visual studio.Click File menu Button in Visual Studio. Here select Add button and click New project button .Now a dialog box will open here. In the left menu select here Other Project Type. It has some sub-menu. In the sub menu select Visual Studio Installer button. Then we get some option like here
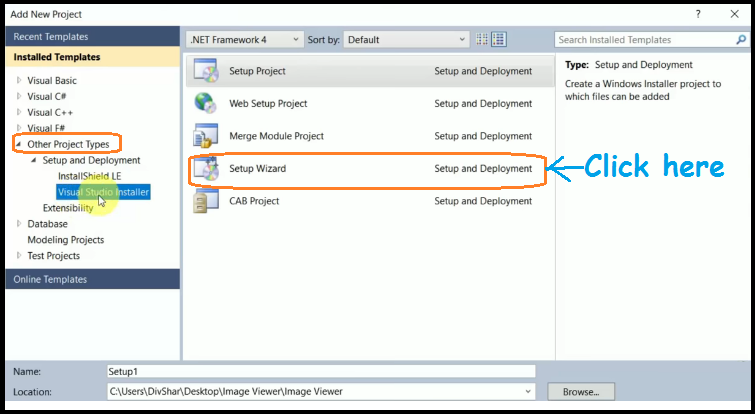
In the Visual installer we select Setup wizard here and and give the name in the name box as like image viewer and select the place where you want to save this .exe file in your computer and click the OK button.
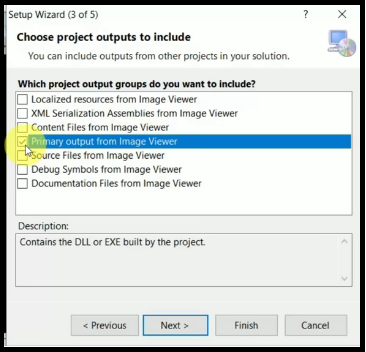
When you click OK button Then you get a new setup wizard window. Here click the next button.Now click Next Button here. Nothing is changes here.Now you got this type window here you select your software name and click next button here as like
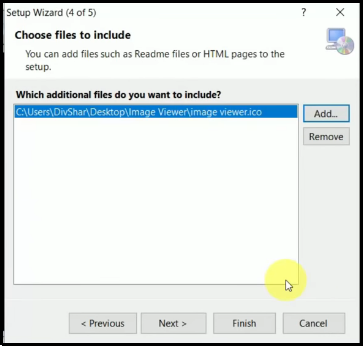
After clicking next button we get another window here. If we have added any additional file in our software as like we are added a software icon in PDF Viewer software than we add here by clicking add button and click next Button here.
Now another window will open here. Now we click the finish button. After clicking this finish Button we get another window will open here. It will divided in 3 parts as like here
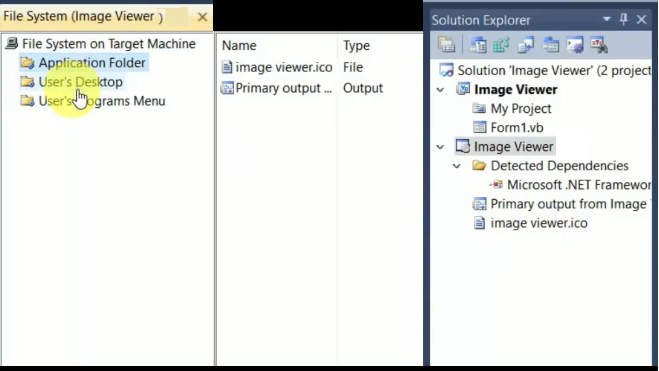
In the left part when we see 3 menu.
- Application folder -:
- User Desktop
- User’s program menu
Application folder-:We see this type file show in application folder. we can create a shortcut file. When we open this folder we see here as like
For creating a short cut select the primary output and right click the mouse then a menu will open here. In this menu create short cut button of image viewer. Now another primary output will added here. Now rename primary output it. Now select the property here using image viewer and chose icon property here. Select icon image here.
As like this process we can add desktop user shortcut and start menu shortcut here. All the process are same here.
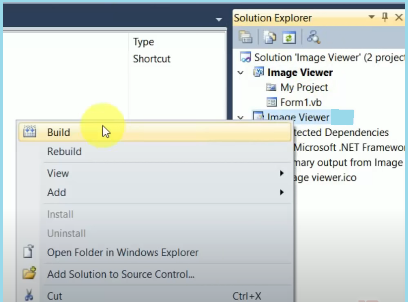
Now we click the right Side image viewer button that is showing in the solution explorer and right click mouse. Then a menu will open here.Here we click build button here.as like
After taking some time our software or we can say that our .exe file are ready in the folder. We can use this .exe file in any computer or any system.
Note -: By using this process we can create .exe file or software for c# programming language, C++ programming, visual F etc. language.
