Introduction of list box control in asp.net csharp-: We know that the list box control is the server side control. The list box control have collection of items. We can add or remove any item pro-grammatically. The list box control provides a single line selection or multi-line selection list. To enable multiple selection set the SelectionMode property to multiple.
How to add list box in our page -: For adding list box control we can add by clicking tool box menu double click or drag and drop process. We can add list box using the source code .For example
<asp:ListBox ID="ListBox1" runat="server">

    <asp:listitem>add here item first</listitem>
     <asp:listitem>add here item second</listitem>

</asp:ListBox >
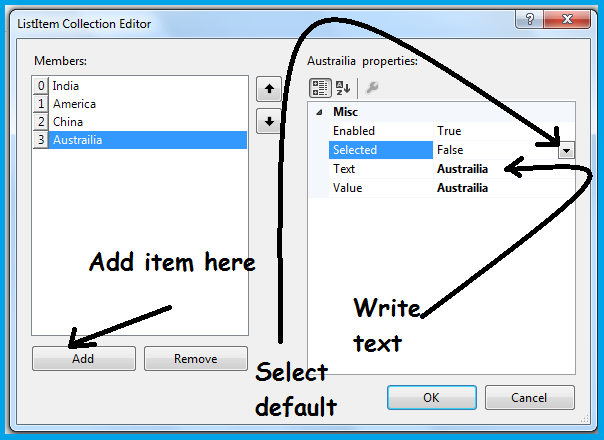
How to add item in list box control in asp.net csharp -: We can add ListItem selecting the property and choose items property now we get a window as like here.
We can add item list in the design view. For adding the item in list box we can click the Items property now this window will open here. In this window we click the add button for adding items. After adding we write the name in text box.
For example if we are creating a country list then we write the text in India. Now select next add item then give the text name America. For removing any item in listbox we can select and click the remove button here.
If we want select any particular list box item. first select the item then we set the selected item is true. If we want to invisible then select the enabled property is false.
List Box property -: All the property are same as like label control property as like id, font,back color, etc. Some different property has been showing here.
Items-: This property is use to add or remove items in the list box.
Rows-:Gets /sets the number of row in list box.
SelectionMode-: In the list box we can set the single line or multi-line .
SelectedIndex-: We can set the lowest ordinal index of the selected item in the list.
SelectedValu-: Gets the value of the selected item in the list box control or selected the item in the list box control that contain the specific value.
SelectedItem-:Get the selected item with the lowest item in the list control.
How to add item in list box using server side-: For adding a item in the server side we take a example.For adding a server side we need a input tools. For input data we take a TextBox control, we take two button add an delete button, and take a list box as like here
<div>
<asp:TextBox ID="TextBox1" runat="server" BorderColor="#003366" BorderStyle="Solid" Height="50px" Width="223px"></asp:TextBox>
 <asp:ListBox ID="ListBox1" runat="server" BackColor="#FF99FF" Font-Bold="True" Font-Italic="True" Height="143px" Width="185px"></asp:ListBox>
<asp:Button ID="Button1" runat="server" BackColor="#FF66CC" Font-Bold="True" Font-Italic="True" Height="48px" OnClick="Button1_Click" Text="Add" Width="77px" />
 <asp:Button ID="Button2" runat="server" BackColor="#FF66FF" Font-Bold="True" Font-Italic="True" Height="44px" OnClick="Button2_Click" Text="Delete" Width="112px" />
</div>
Now we create a programming in listbox.aspx.cs page here as like
using System;
using System.Collections.Generic;
using System.Linq;
using System.Web;
using System.Web.UI;
using System.Web.UI.WebControls;

public partial class listbox : System.Web.UI.Page
{
    protected void Page_Load(object sender, EventArgs e)
    {

    }
    protected void Button1_Click(object sender, EventArgs e)
    {
        ListBox1.Items.Add(TextBox1.Text);
        TextBox1.Text = "";
    }
    protected void Button2_Click(object sender, EventArgs e)
    {
        if (ListBox1.SelectedIndex > -1)
        {
            ListBox1.Items.RemoveAt(ListBox1.SelectedIndex);
        }
    }
}
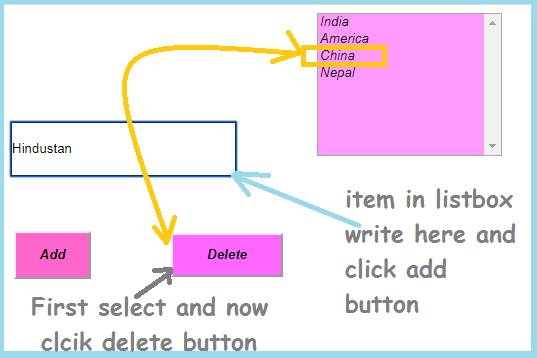
When we run this program it look like this way
By clicking add item on server side we write the text name in the text box and click the add button. It will added in our list box. For deleting the text box select the item and click delete button. It will remove in your list box.

