Image Viewer Software Introduction -: For creating the image viewer software it is necessary to know what is the use of Image Viewer software. Today there are many Image viewer software available in the market. These software are using to view the images or photos. When we take photos or image a software is necessary to view these photos.
In other words we can say that the an image viewer is a computer software program. By the help of this software we can display stored graphical images or photos. It can handle various graphics file formats Such software usually renders the image according to properties of the display such as color depth, display resolution, and color profile.
Create Image Viewer Software -: For creating a Image Viewer Software we know that a programming language must be necessary. First we select the programming language. Here we are selecting Visual Basic (VB) programming language for creating a software.
We are using Microsoft Visual Studio here for Create Image Viewer Software. Microsoft Visual Studio is an integrated development environment (IDE) from Microsoft. It is used to develop computer programs, as Window application, websites application, web apps, web services and mobile apps.
For creating software follow these process-:
1-: First download the visual studio. there are many version available . you can download and install it. There are many version available here.
2-: After Installing Visual Studio you can open it.
3-: Now click the File Menu option in the visual studio. In the File Menu You can select the New Project. When we get a dialogue box open here as like
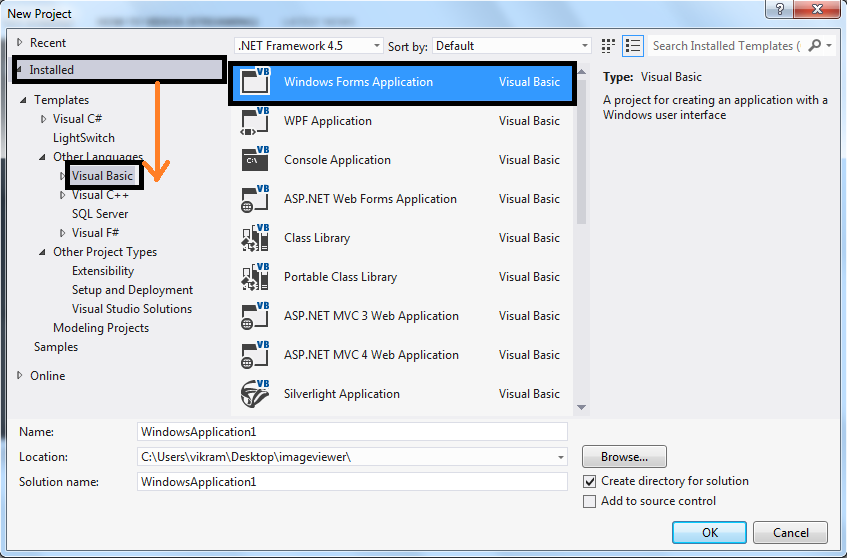
4-: We here clicked Installed button in the left side. There are many language list will show here. here we select the Visual Basic . Now We select .Net framework which is the latest in our Visual studio. here I am using .Net framework 4.5 it is the latest in my visual studio. You can choose according your Visual studio. Here we select Window form application .
5–: After selecting window form application we give the Name of the window form according us. Now we are creating a image viewer software then we give the name of form image viewer. Now select Location where you want to save this . If you don’t give the name it takes automatic as like window application and its saved into “C ” drive where the Visual studio are Installed.
File —-> New Project—-> Installed —>Visual Basic—->Window Form application —->Name—–> Select Location ——> OK
6-: After clicking a OK button we get a form here. Visual studio provide many facility.This will look like as a
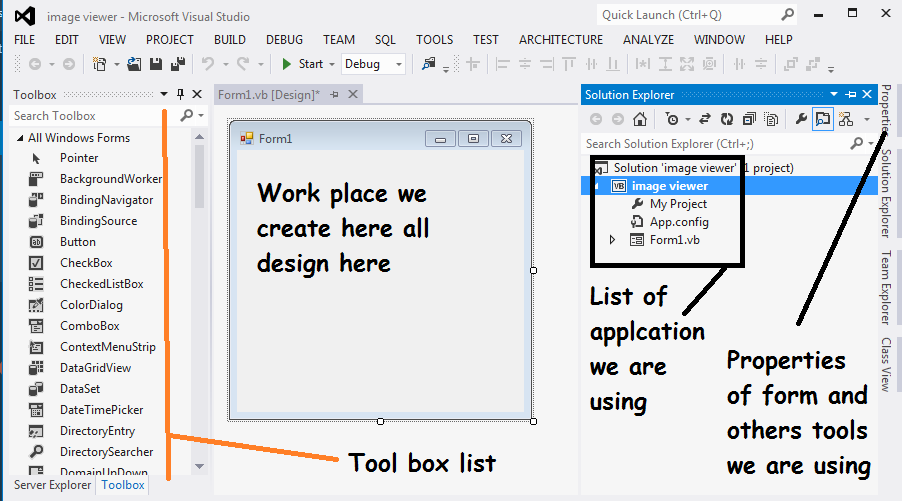
7-: In the visual studio has 3 parts . In the left side a Tool box List has been given. In the Right side Properties, solution Explorer, Team Explorer, Class view list has been given. In the center a Form1 has been given. It is workplace. Here we create the design and Drag and drop tools from the tools box .
8.-: In the above Image the form1 is showing here. We right click the form then we get a menu here. Here we select the property option then the form property will open here. In the property menu we give the name of Text here image viewer .Here we can select windowstate position Maximum or you can choose according. Here another property of form i am taking the startpostion and choosing center screen here. Here are many option available here as like
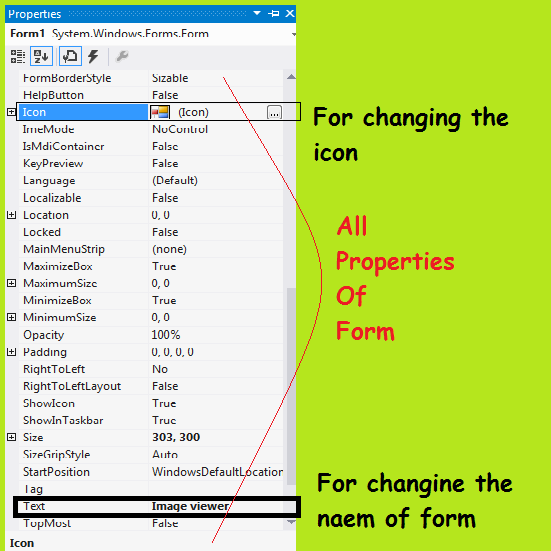
9-: Above the image we are showing the form properties. We can use here. Here are many property available we can use these properties. but i am using two option first Text name i am giving here image viewer and second is the icon. For giving the image icon it is necessary to image icon must be saved in the same folder where is the project are saving.
10-: Now i am using MenuStrip from the toolbox. Double click in the tool box or drag and drop in the form .You can use Button here. I am using MenuStrip. Here i am giving 3 menu
- Show Image -: For showing the image or browse the image folder
- Next -: For showing the next Image or photos
- Back -: For showing the previous button
11-: After Giving the MenuStrip we choose the PictureBox in the tools box. We double click the PictureBox or drag and drop here on the form. This will using for showing the image or photos. In this area the picture or image or photos will show here. It has a property as like form property.
Note—-: In the visual studio every tools has own property. It is different to each other. We can reset there size,height,with,access key, etc.
12-: In the PictureBox property we can select Dock and choose picture size here If we want to give the color then we select the back color suppose i am giving the black color then select the back color property and choose red color here.
13-: Now we Upload a FolderBrowserDialog tools for uploading a image folder. we can drag and drop here . Now the our Design part are ready and its looks like this..
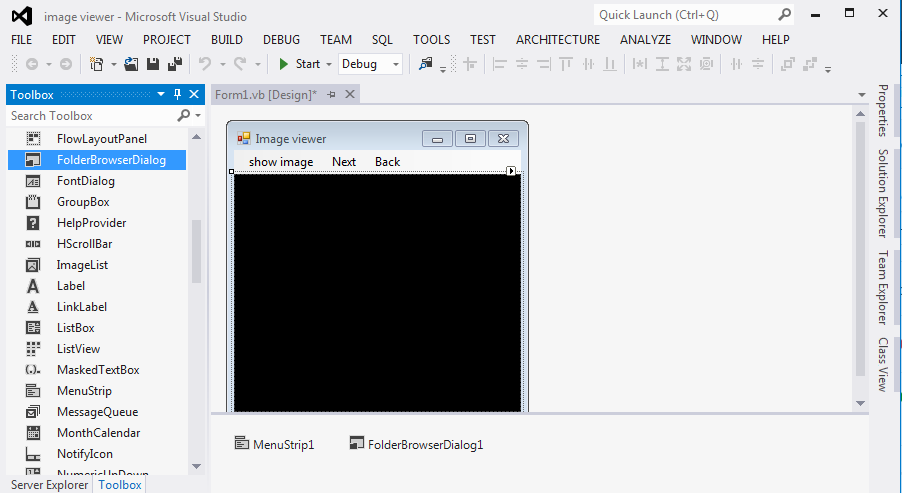
14-: Now the Double click from the form.Another page name form1.vb* and Design form name form1.vb[design] When we click we get the coding part page here. Here we create programming for showing the image here.
Public Class Form1Private Sub Form1_Load(sender As Object, e As EventArgs) Handles MyBase.LoadEnd SubEnd Class
In this programming all the class which is starting must be close. If we don’t close then the error comes.
15-: Now we go to the design part and double click on all the form here we do the coding in the form1.vb page. First we declare the variable as like here Dim filnames(variable name). we take another variable name counter.
Public Class Form1
     Dim filenames As List(Of String) = New List(Of String)      //declare for variable
     Dim counter As Integer = 0                       //dim for  Dimension
 Private Sub Form1_Load(sender As Object, e As EventArgs) Handles MyBase.Load End Sub
16-: Now go the the design part and click the show mage button and click double click. Now we get some coding here as like
Private Sub ShowImageToolStripMenuItem_Click(sender As Object, e As EventArgs) Handles ShowImageToolStripMenuItem.Click

// Write the code here
 End Sub
After getting this we give the coding here. We write this code into here as like
Private Sub ShowImageToolStripMenuItem_Click(sender As Object, e As EventArgs) Handles ShowImageToolStripMenuItem.Click


         If FolderBrowserDialog1.ShowDialog() = Windows.Forms.DialogResult.OK Then

             filenames.AddRange(System.IO.Directory.GetFiles(FolderBrowserDialog1.SelectedPath, ".jpg"))
          filenames.AddRange(System.IO.Directory.GetFiles(FolderBrowserDialog1.SelectedPath, ".bmp"))

             filenames.AddRange(System.IO.Directory.GetFiles(FolderBrowserDialog1.SelectedPath, "*.png"))

             If filenames.Count > 1 Then PictureBox1.Load(filenames(counter))
         End If
         Refresh()
 End Sub
17-: Now we Go to the design part and double click Next button We write this coding here as like
Private Sub BackToolStripMenuItem_Click(sender As Object, e As EventArgs) Handles BackToolStripMenuItem.Click

         If counter > 0 Then
             counter -= 1
         Else
             counter = filenames.Count - 1
     End If     PictureBox1.Load(filenames(counter))

 End Sub
18-: Now go to the design parts again and double click the Back button and write this code..
Private Sub NextToolStripMenuItem_Click(sender As Object, e As EventArgs) Handles NextToolStripMenuItem.Click


         If counter < filenames.Count - 1 Then
             counter += 1
         Else
             counter = 0
     End If     PictureBox1.Load(filenames(counter))

 End Sub
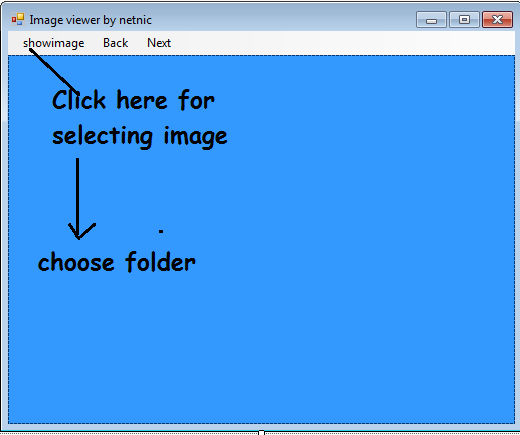
19-:Now the our software is ready. We can run this program. It is working well condition. It is showing the image here. Here is the complete coding of this program.
Public Class Form1
    Dim filenames As List(Of String) = New List(Of String)
    Dim counter As Integer = 0


    Private Sub Form1_Load(sender As Object, e As EventArgs) Handles MyBase.Load

    End Sub

    Private Sub ShowImageToolStripMenuItem_Click(sender As Object, e As EventArgs) Handles ShowImageToolStripMenuItem.Click
        If FolderBrowserDialog1.ShowDialog() = Windows.Forms.DialogResult.OK Then
            filenames.AddRange(System.IO.Directory.GetFiles(FolderBrowserDialog1.SelectedPath, "*.jpg"))
            filenames.AddRange(System.IO.Directory.GetFiles(FolderBrowserDialog1.SelectedPath, "*.bmp"))
            filenames.AddRange(System.IO.Directory.GetFiles(FolderBrowserDialog1.SelectedPath, "*.png"))
            If filenames.Count > 1 Then PictureBox1.Load(filenames(counter))
        End If
        Refresh()

    End Sub

    Private Sub BackToolStripMenuItem_Click(sender As Object, e As EventArgs) Handles BackToolStripMenuItem.Click
        If counter > 0 Then
            counter -= 1
        Else
            counter = filenames.Count - 1

        End If
        PictureBox1.Load(filenames(counter))
    End Sub

    Private Sub NextToolStripMenuItem_Click(sender As Object, e As EventArgs) Handles NextToolStripMenuItem.Click
        If counter < filenames.Count - 1 Then
            counter += 1
        Else
            counter = 0

        End If
        PictureBox1.Load(filenames(counter))
    End Sub
End Class
Our software is ready for use. We can run this program. We dubbing this program. when we run this program it looks like this way.
Now Our software is ready for creating the software. For creating software or .exe file click here