Microsoft Word View Menu-: Short key of this menu CTRL+V. By the help of mouse we can open view menu or CTRL+v by the help of keyboard we can open it this menu
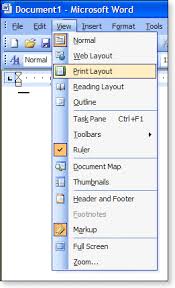
In this menu we see this menu
1.Normal -: By the help of this command we can see the documents in normal view.
2.Web Lay Out-:By the help of this command when we are creating a web page using the Microsoft word we can see how is look at a web server.
3.Print Layout View-:By the help of this command documents will be show how is looking after printing . In this documents we can see about header,footer,graphics,outline,inline etc.
4.Outline -:By the help of this command we can see the outline of the documents.
5.Toolbar-:View menu providing many toolbar in this option as like
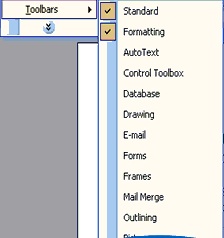
by the help of this command we can show many toolbar and hide them also.
A. Create a new tool Bar – By the using this menu we can create a new tool bar in Microsoft Word. When we click a new toolbar button a window will open its ask the name of toolbar. we give the toolbar name and choose the button of this menu
B-Deleting tool bar -: In Microsoft Word we can remove those tool bar who are created by us. First go to the customize Dialogue and choose the deleting toolbar and click delete button.
6.Ruler-:This command is use for showing and hiding the ruler.
7.Header and Footer-:By the help of this command we can give the header and footer in the documents.
8.Footnote-:By the help of this command we can see the footnote in our documents
9.Comment-: By the help of this command we can give annotation. Annotation is describe to a word in documents.
10.Full screen-: By the help of this command we can show full screen of documents.
11.Zoom-:BY the help of this command we can do the size of documents